How to set up preview environments in AWS


Introduction
Preview environments are a crucial tool for modern software projects. Providers such as Vercel provide them, but what if you want to set them up on your cloud infrastructure, such as AWS?
In this guide, we'll have a look at how this can be done.
Video version
What do preview environments solve
As your application grows, it may become hard to work on many features at the same time.
- Different features can take different amounts of time to develop.
- There might be blockers that arise for a particular feature.
- If you have a single staging environment, it may be hard to test and release several features at the same time because changes from one feature might conflict with another feature.
- Because of that, the CI/CD workflow where there's a single staging can often reduce the velocity of the team.
- As background AI agents improve, the need for feature previews increases because, as developers, we might want to hand off some work to be done in the background and review it later.
- In a sense, the faster you or your team works, the more important it is to have preview environments, because you'll have more things to test at any given time.
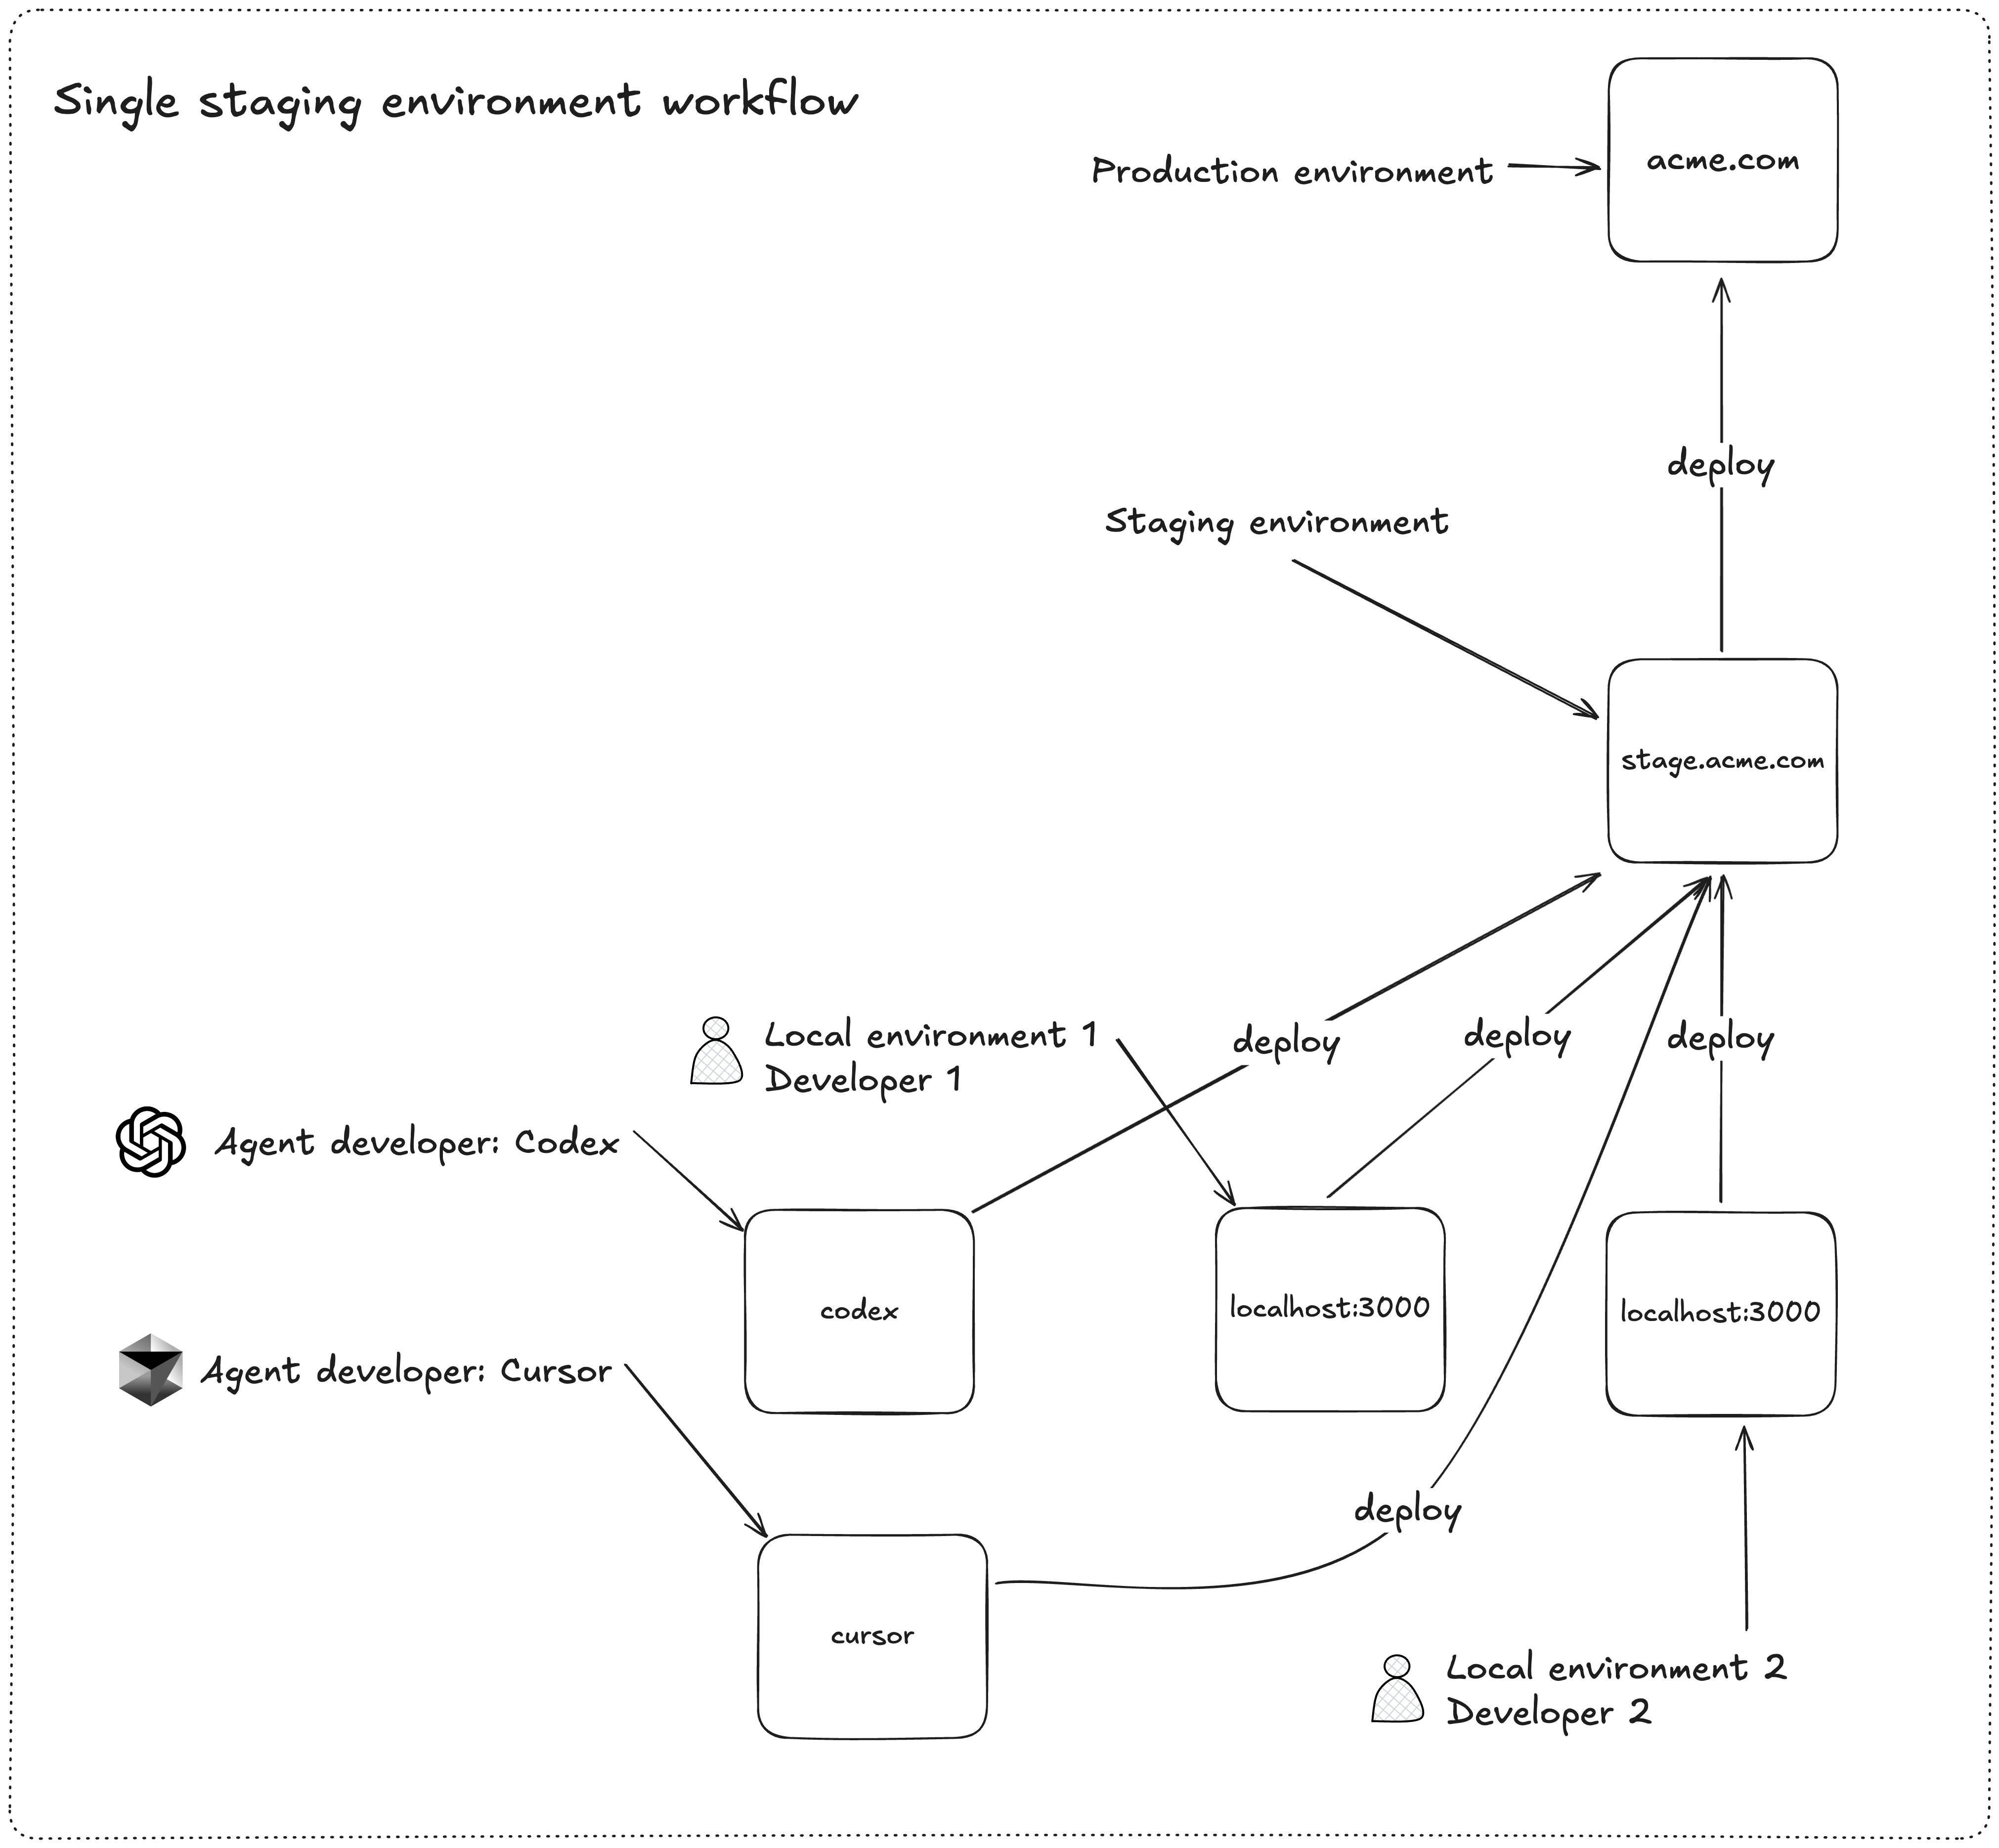
Here's a visual diagram of a single staging environment workflow. This setup is the default approach most applications use.
Let's compare it with the preview environment workflow.
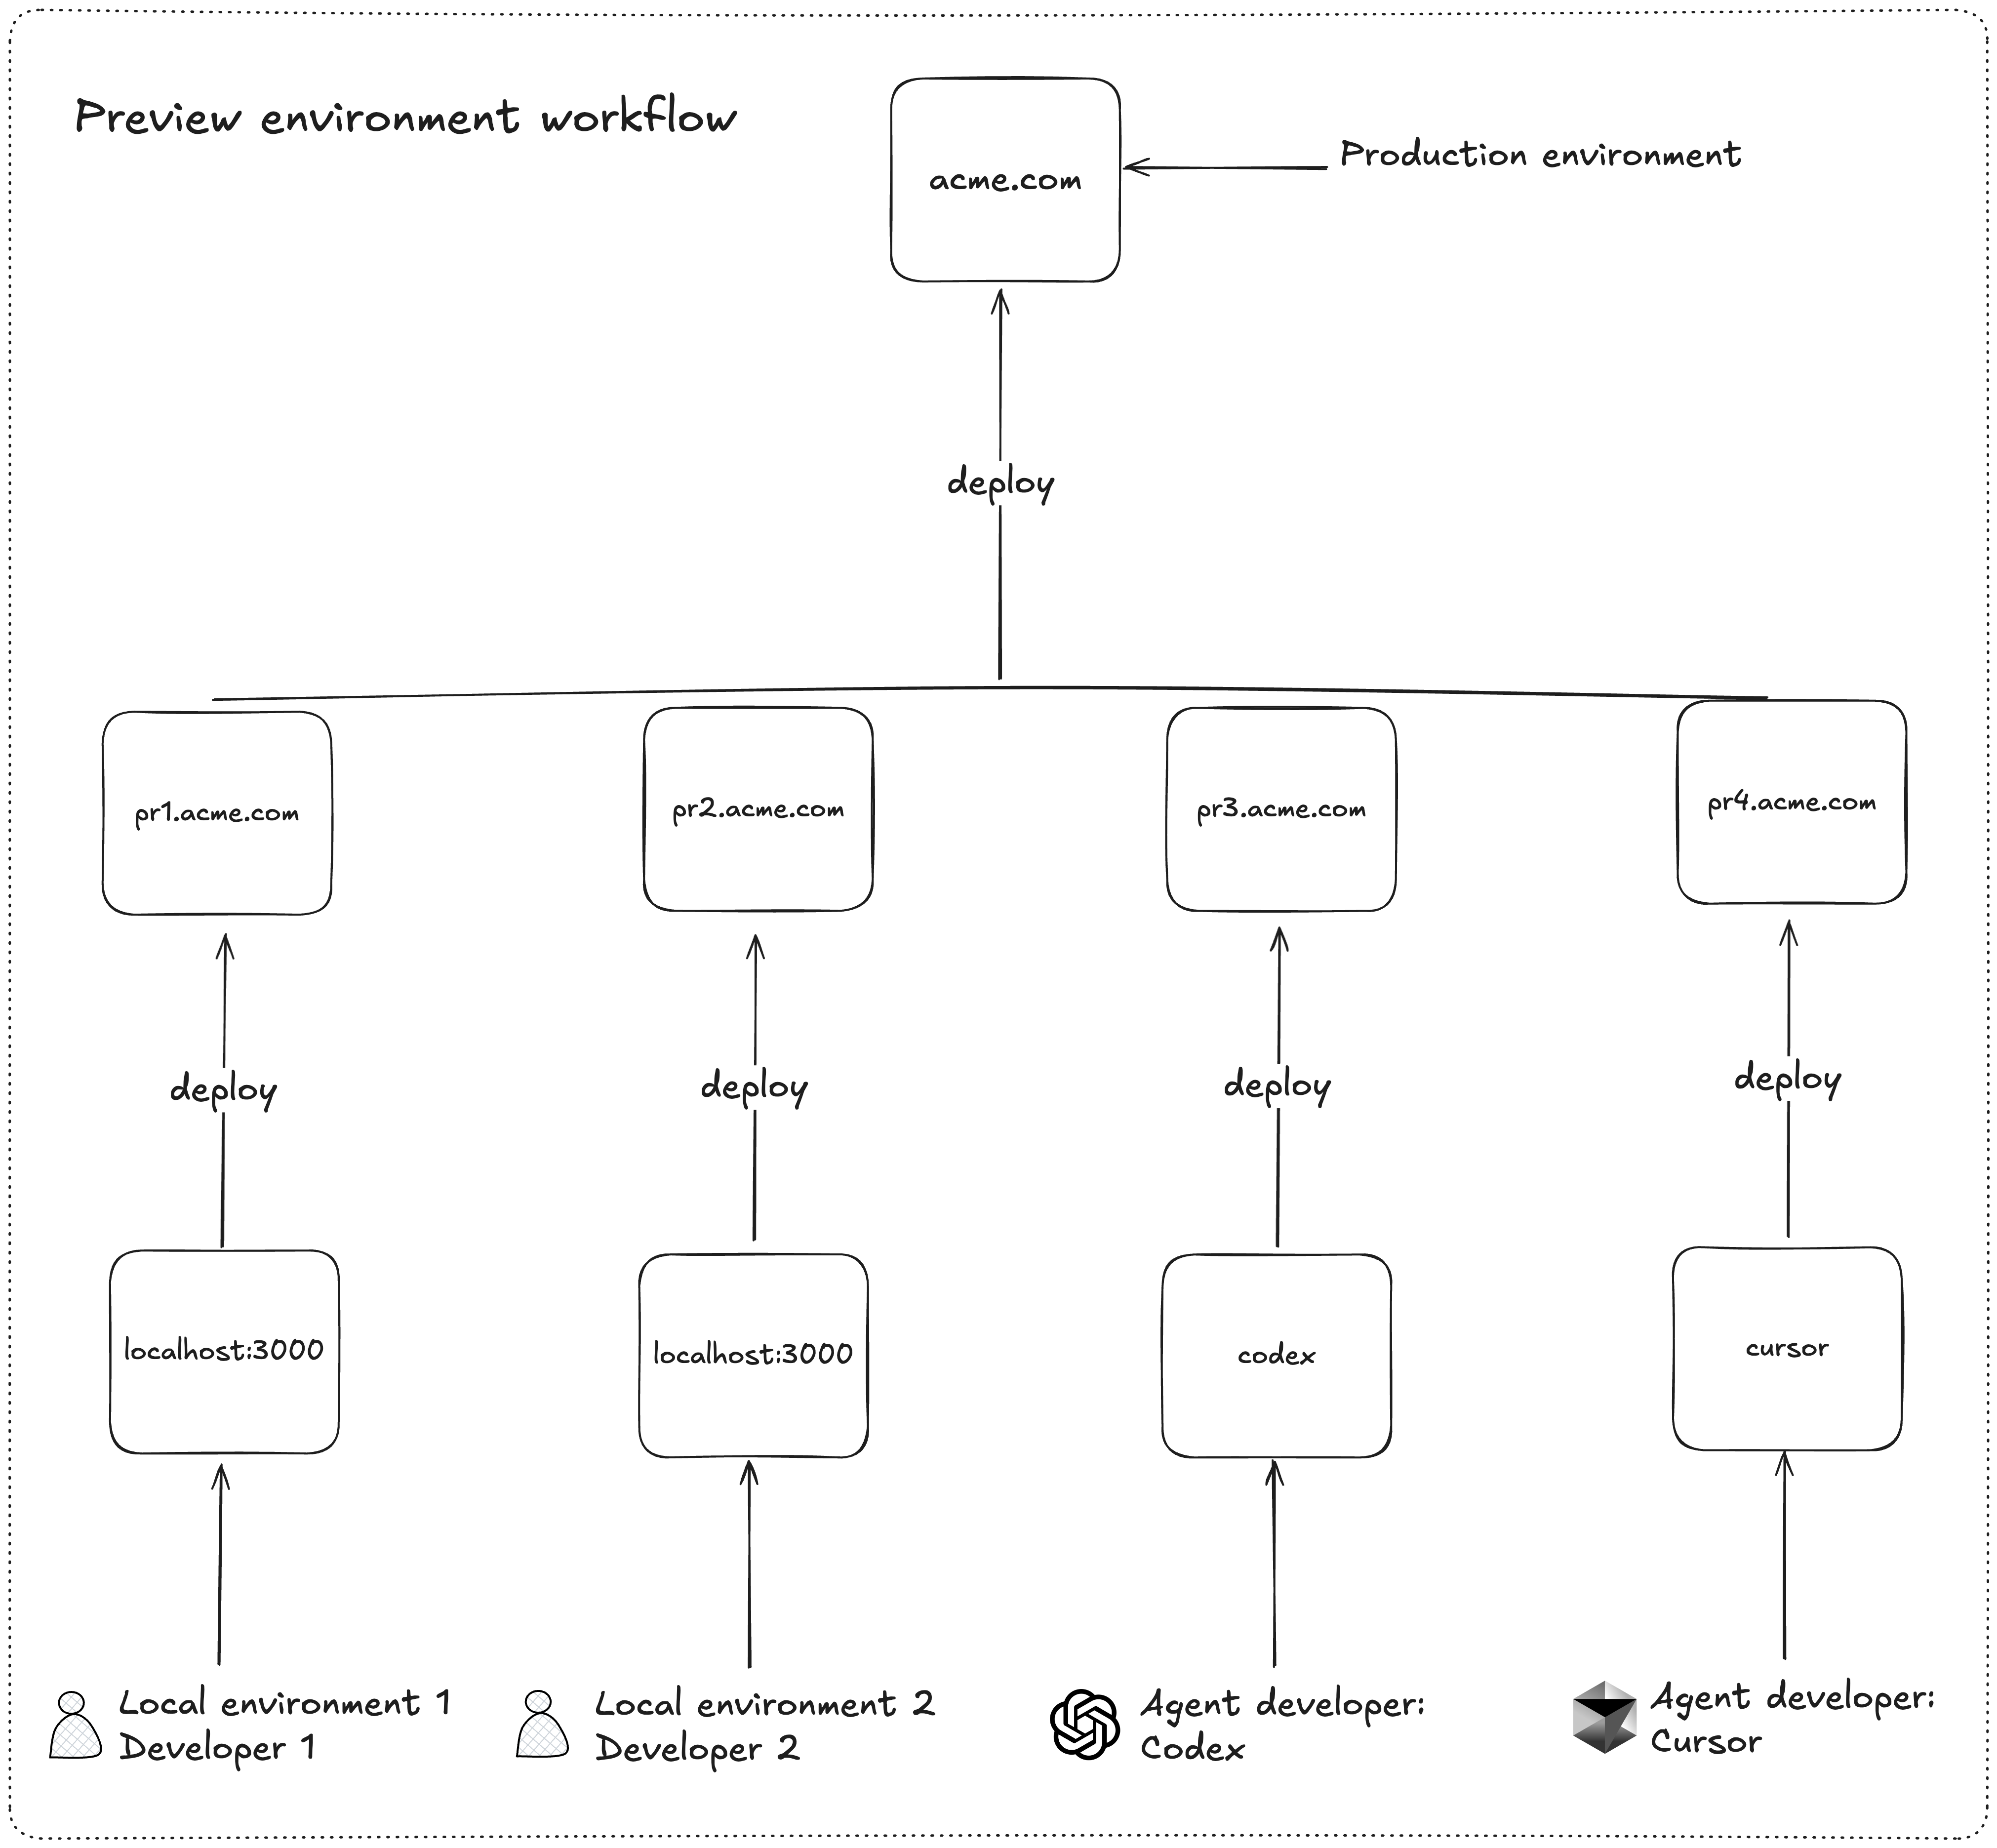
Preview environments solve these problems by creating separate environments for each feature or bug that the team is working on.
These can be implemented and tested independently, so even if you work on 20 features at the same time, there will be no blockers when testing those features and releasing them.
In the next section, we'll have a look at practical examples of how to implement such a setup.
Tools we're going to use
This implementation is using:
- GitHub actions - Git Ops + CI/CD platform.
- SST - Infrastructure as code tool.
- AWS - Cloud provider.
- Next.js - Framework.
These tools can be changed to the ones you or your organisation prefers and uses. The general principles will apply.
What do we need for feature previews?
First, let's take a look at the different parts that make up such a workflow.
A way to provision infrastructure
You need some way to provision the infrastructure. I'm not a fan of click ops, so I opt for infrastructure as code tools like SST. I've had a good experience overall with it so far, so I would recommend it.
To know what resources to provision
We need to know what type of infrastructure we need to provision for each provision environment.
In this article, I show an example of SST's Next.js construct. It configures things like AWS Lambda functions and S3 storage buckets for us automatically.
If your application is more complex and has databases, caches, and containerised services, then you might need to share the resources between the different environments.
Sharing those resources will allow you to save costs, as provisioning stateful services for each environment might get quite expensive.
A continuous integration setup
In this example, it will be GitHub Actions. But it could also be GitLab, BitBucket, Jenkins or any other CI/CD provider.
The main requirement here is for you to be able to set up declarative actions of how the CI/CD pipelines should act.
A place to host code and open merge requests
In this example, it will be GitHub. But it could also be GitLab, BitBucket or any other Git Ops provider.
How do feature previews work?
Let's examine step by step how the parts described above connect to produce the desired result:
A developer pushes a code change, and an isolated environment is created. The team can review the work in that environment.
1. Developer opens a merge request
Here's what happens:
- Github Actions get called.
- Inside GitHub Actions, there's a script that calls SST.
- SST takes the pull request number and creates a stage for it with that name.
- For example PR-27
- SST provisions the needed resources in AWS.
- The resources are connected to a unique URL like 123.cloudfront.net
- GitHub Actions adds a comment to the merge request with the CloudFront URL.
2. The preview environment is created:
Here's what happens:
- The team can review the code and check the changes in the preview environment.
- Manual QA is also possible for those changes because they're isolated from the rest of the application.
- This environment is completely separate from any staging or production environments you might have.
3. The changes are merged:
Here's what happens:
- The clean-up Github Action is triggered.
- It removes the resources that were created for the preview environment.
- The production deployment GitHub Action is triggered.
- The changes are deployed to the existing infrastructure for production.
Implementation
Let's look at how to implement preview environments in AWS + GitHub.
Configuring AWS
- Log in to your AWS Console
- Go to IAM (Identity and Access Management)
- Navigate to "Users" in the left sidebar
- Either select an existing user or create a new one
- Attach security policies for this user. To do that, go to:
- IAM -> Policies
- Create a new policy
- Under the "Security credentials" tab:
- For a new user: Click "Create access key"
- For an existing user: Click "Create access key" in the "Access keys" section
When you create the access key:
- The AWS_ACCESS_KEY_ID is the "Access key ID"
- The AWS_SECRET_ACCESS_KEY is the "Secret access key"
⚠️ Security notes:
Make sure to save these credentials immediately when they're shown - the secret access key cannot be retrieved again after initial creation
Use a dedicated IAM user with minimal required permissions for your GitHub Actions. This will depend on the infrastructure your app requires.
Never commit these credentials to your repository as they could be visible in the Git history later on.
Configuring GitHub
Once you have these credentials, you should add them to your GitHub repository:
- Go to your repository Settings
- Navigate to Secrets and Variables > Actions
Add two new repository secrets:- Name: AWS_ACCESS_KEY_ID with the access key ID value
- Name: AWS_SECRET_ACCESS_KEY with the secret access key value
💡 Note: In addition to the AWS keys, you also need to configure the env variables that your application uses. Examples below include the ones I used, but they will differ depending on your application.
Github Action configuration for the preview environment
name: Deploy Preview Environment

on:
  pull_request:
    types: [opened, synchronize, reopened]

# Add concurrency group per PR
concurrency:
  group: "preview-${{ github.event.pull_request.number }}"
  cancel-in-progress: false

env:
  SST_STAGE: pr-${{ github.event.pull_request.number }}
  NEXT_PUBLIC_SANITY_PROJECT_ID: ${{ secrets.NEXT_PUBLIC_SANITY_PROJECT_ID }}
  NEXT_PUBLIC_SANITY_DATASET: ${{ secrets.NEXT_PUBLIC_SANITY_DATASET }}
  NEXT_PUBLIC_SANITY_API_VERSION: ${{ secrets.NEXT_PUBLIC_SANITY_API_VERSION }}
  CLOUDFLARE_API_TOKEN: ${{ secrets.CLOUDFLARE_API_TOKEN }}
  CLOUDFLARE_DEFAULT_ACCOUNT_ID: ${{ secrets.CLOUDFLARE_DEFAULT_ACCOUNT_ID }}
  CLOUDFLARE_EMAIL: ${{ secrets.CLOUDFLARE_EMAIL }}
  AWS_REGION: us-east-1
  NOTION_CONTACTS_DATABASE_ID: ${{ secrets.NOTION_CONTACTS_DATABASE_ID }}
  NOTION_TOKEN: ${{ secrets.NOTION_TOKEN }}
  R2_ENDPOINT: ${{ secrets.R2_ENDPOINT }}
  R2_ACCESS_KEY_ID: ${{ secrets.R2_ACCESS_KEY_ID }}
  R2_SECRET_ACCESS_KEY: ${{ secrets.R2_SECRET_ACCESS_KEY }}
  R2_BUCKET_NAME: ${{ secrets.R2_BUCKET_NAME }}
  R2_PUBLIC_URL: ${{ secrets.R2_PUBLIC_URL }}
  NEXT_PUBLIC_R2_UPLOAD_SECRET_TOKEN: ${{ secrets.NEXT_PUBLIC_R2_UPLOAD_SECRET_TOKEN }}

jobs:
  deploy-preview:
    runs-on: ubuntu-latest
    environment: Preview
    permissions:
      contents: read
      pull-requests: write

    steps:
      - uses: actions/checkout@v4

      - name: Setup Node.js
        uses: actions/setup-node@v4
        with:
          node-version: "24.2.0"
          cache: "npm"

      - name: Install dependencies
        run: npm ci

      - name: Run lint
        run: npm run lint

      - name: Run tests
        run: npm run test

      - name: Configure AWS credentials
        uses: aws-actions/configure-aws-credentials@v4
        with:
          aws-access-key-id: ${{ secrets.AWS_ACCESS_KEY_ID }}
          aws-secret-access-key: ${{ secrets.AWS_SECRET_ACCESS_KEY }}
          aws-region: ${{ env.AWS_REGION }}

      - name: Deploy preview
        id: deploy
        run: |
          set -o pipefail
          DEPLOY_LOG=$(mktemp)
          npx sst deploy --stage ${{ env.SST_STAGE }} 2>&1 | tee "$DEPLOY_LOG"
          DEPLOY_EXIT_CODE=${PIPESTATUS[0]}

          PREVIEW_URL=$(grep -o 'https://[^[:space:]]*cloudfront.net' "$DEPLOY_LOG" || true)
          if [ -n "$PREVIEW_URL" ]; then
            echo "PREVIEW_URL=$PREVIEW_URL" >> "$GITHUB_ENV"
          fi

          exit $DEPLOY_EXIT_CODE

      - name: Comment PR
        if: env.PREVIEW_URL != ''
        uses: actions/github-script@v7
        with:
          script: |
            const previewUrl = process.env.PREVIEW_URL;
            const message = `🚀 Preview environment deployed!\n\nYou can view your changes at: ${previewUrl}\n\nStage name: \`${process.env.SST_STAGE}\``;
            github.rest.issues.createComment({
              issue_number: context.issue.number,
              owner: context.repo.owner,
              repo: context.repo.repo,
              body: message
            });
Github Action configuration for the preview environment clean up
name: Cleanup Preview Environment

on:
  pull_request:
    types: [closed]

# Add concurrency group per PR
concurrency:
  group: "preview-${{ github.event.pull_request.number }}"
  cancel-in-progress: false

env:
  SST_STAGE: pr-${{ github.event.pull_request.number }}
  CLOUDFLARE_API_TOKEN: ${{ secrets.CLOUDFLARE_API_TOKEN }}
  CLOUDFLARE_DEFAULT_ACCOUNT_ID: ${{ secrets.CLOUDFLARE_DEFAULT_ACCOUNT_ID }}
  CLOUDFLARE_EMAIL: ${{ secrets.CLOUDFLARE_EMAIL }}

jobs:
  cleanup:
    runs-on: ubuntu-latest
    environment: Preview
    permissions:
      contents: read
      issues: write
      pull-requests: write

    steps:
      - uses: actions/checkout@v4

      - name: Setup Node.js
        uses: actions/setup-node@v4
        with:
          node-version: "24.2.0"
          cache: "npm"

      - name: Install dependencies
        run: npm ci

      - name: Configure AWS credentials
        uses: aws-actions/configure-aws-credentials@v4
        with:
          aws-access-key-id: ${{ secrets.AWS_ACCESS_KEY_ID }}
          aws-secret-access-key: ${{ secrets.AWS_SECRET_ACCESS_KEY }}
          aws-region: us-east-1

      - name: Remove preview environment
        run: npx sst remove --stage ${{ env.SST_STAGE }}

      - name: Comment PR
        uses: actions/github-script@v7
        with:
          script: |
            const message = `🧹 Preview environment cleaned up!\n\nStage \`${process.env.SST_STAGE}\` has been removed.`;
            github.rest.issues.createComment({
              issue_number: context.issue.number,
              owner: context.repo.owner,
              repo: context.repo.repo,
              body: message
            });
Github Action configuration for the production environment
name: Deploy Production

on:
  push:
    branches: [main]

# when deploying multiple PRs at the same time, only the latest one will be deployed
concurrency:
  group: "production"
  cancel-in-progress: false

env:
  SST_STAGE: production
  NEXT_PUBLIC_SANITY_PROJECT_ID: ${{ secrets.NEXT_PUBLIC_SANITY_PROJECT_ID }}
  NEXT_PUBLIC_SANITY_DATASET: ${{ secrets.NEXT_PUBLIC_SANITY_DATASET }}
  NEXT_PUBLIC_SANITY_API_VERSION: ${{ secrets.NEXT_PUBLIC_SANITY_API_VERSION }}
  CLOUDFLARE_API_TOKEN: ${{ secrets.CLOUDFLARE_API_TOKEN }}
  CLOUDFLARE_DEFAULT_ACCOUNT_ID: ${{ secrets.CLOUDFLARE_DEFAULT_ACCOUNT_ID }}
  CLOUDFLARE_EMAIL: ${{ secrets.CLOUDFLARE_EMAIL }}
  AWS_REGION: us-east-1
  AWS_SDK_LOAD_CONFIG: 0
  NOTION_CONTACTS_DATABASE_ID: ${{ secrets.NOTION_CONTACTS_DATABASE_ID }}
  NOTION_TOKEN: ${{ secrets.NOTION_TOKEN }}
  R2_ENDPOINT: ${{ secrets.R2_ENDPOINT }}
  R2_ACCESS_KEY_ID: ${{ secrets.R2_ACCESS_KEY_ID }}
  R2_SECRET_ACCESS_KEY: ${{ secrets.R2_SECRET_ACCESS_KEY }}
  R2_BUCKET_NAME: ${{ secrets.R2_BUCKET_NAME }}
  R2_PUBLIC_URL: ${{ secrets.R2_PUBLIC_URL }}
  NEXT_PUBLIC_R2_UPLOAD_SECRET_TOKEN: ${{ secrets.NEXT_PUBLIC_R2_UPLOAD_SECRET_TOKEN }}

jobs:
  deploy-production:
    runs-on: ubuntu-latest
    environment: Production
    permissions:
      contents: read

    steps:
      - uses: actions/checkout@v4

      - name: Setup Node.js
        uses: actions/setup-node@v4
        with:
          node-version: "24.2.0"
          cache: "npm"

      - name: Install dependencies
        run: npm ci

      - name: Run lint
        run: npm run lint

      - name: Run tests
        run: npm run test

      - name: Configure AWS credentials
        uses: aws-actions/configure-aws-credentials@v4
        with:
          aws-access-key-id: ${{ secrets.AWS_ACCESS_KEY_ID }}
          aws-secret-access-key: ${{ secrets.AWS_SECRET_ACCESS_KEY }}
          aws-region: ${{ env.AWS_REGION }}

      - name: Deploy production
        env:
          CI: true
          AWS_ACCESS_KEY_ID: ${{ secrets.AWS_ACCESS_KEY_ID }}
          AWS_SECRET_ACCESS_KEY: ${{ secrets.AWS_SECRET_ACCESS_KEY }}
          AWS_REGION: ${{ env.AWS_REGION }}
          AWS_PROFILE: "default"
          AWS_SDK_LOAD_CONFIG: 1
          NOTION_CONTACTS_DATABASE_ID: ${{ secrets.NOTION_CONTACTS_DATABASE_ID }}
          NOTION_TOKEN: ${{ secrets.NOTION_TOKEN }}
          R2_ENDPOINT: ${{ secrets.R2_ENDPOINT }}
          R2_ACCESS_KEY_ID: ${{ secrets.R2_ACCESS_KEY_ID }}
          R2_SECRET_ACCESS_KEY: ${{ secrets.R2_SECRET_ACCESS_KEY }}
          R2_BUCKET_NAME: ${{ secrets.R2_BUCKET_NAME }}
          R2_PUBLIC_URL: ${{ secrets.R2_PUBLIC_URL }}
          NEXT_PUBLIC_R2_UPLOAD_SECRET_TOKEN: ${{ secrets.NEXT_PUBLIC_R2_UPLOAD_SECRET_TOKEN }}
        run: |
          aws configure set aws_access_key_id ${{ secrets.AWS_ACCESS_KEY_ID }}
          aws configure set aws_secret_access_key ${{ secrets.AWS_SECRET_ACCESS_KEY }}
          aws configure set region ${{ env.AWS_REGION }}
          npx sst deploy --stage ${{ env.SST_STAGE }}
Connecting a domain
In this setup up I'm using Cloudflare to assign a production domain. However, SST also provides other domain adapters like AWS and Vercel.
I'm managing my domain via API. For that, I've set up the secrets in GitHub Actions from my Cloudflare account.
Advanced use cases
Here are some more resources you might run into in complex production applications.
Concurrency
Since we may merge multiple merge requests at the same time, we need to prevent concurrent deploys. This can be easily done in GitHub actions:
concurrency:
  group: "production"
  cancel-in-progress: false
Database branching
Some features might involve your database schema changes. If you want to use a single database for all your preview environments, you might want to take a look at database branching.
You can use tools like Neon Database branching and automate them with GitHub Workflows.
Even if you use a different database provider like RDS on production, you can still benefit from the database branching for preview environments.
Resource sharing
Some resources, like containers and load balancers, are expensive. Recreating them for each individual stage might add up.
You might want to look at SST resource sharing. You can share those expensive resources across your preview environments.